Support
Update Manual
1. Confirmation before starting
The lens software update can be performed only when an applicable lens is attached to the camera body.
Be sure to attach an applicable lens to the camera body, and then start the update process.
*Attach the lens when the camera body is turned off.
Please refer to the camera's instruction manual or the camera manufacturer's website for details.
The lens update cannot be performed with the following camera bodies.
NEX-3
NEX-5
NEX-C3
NEX-VG10
2. How to check the version of the lens software
Select "Setup" from "Menu" on the camera, and review "Version".
Lens system software version “Ver.02” or below is applicable.
This update is not necessary if the current lens system software is “Ver. 03.”
3. Preparations for software update
Remove the memory card from the camera body beforehand.
Please prepare the following items in addition to the lens and camera body.
■Computer requirements
<Windows>
Supported OS
Windows® 10
Windows® 8.1
Windows® 7 SP1
<Mac OS>
Supported OS
Mac OS X v.10.10 - 10.11 / macOS 10.14
<Hardware requirements>
At least 200MB free space on the hard disk
At least 512MB free space in the memory (RAM)
*Perform the update after closing other application software.
*Disable the computer's sleep setting.
■Other necessary items
<Power supply (for camera)>
Fully charged, dedicated battery pack for your camera
Or the dedicated AC adapter (if the model supports the dedicated AC adapter)
If the battery charge is insufficient, the update cannot be performed.
The use of a sufficiently charged battery or the dedicated AC adaptor is required.
Please perform the update after removing the vertical position grip.
<USB cable attached to the camera body>
Do not use a commercially available USB cable.
4. Notes
To update, please use the fully charged rechargeable battery pack recommended for your camera body, or use the dedicated AC adaptor.
Ensure that power will not be interrupted by securing the battery in the camera or making sure that the connection cable of the AC adaptor/charger will not be disconnected.
If the power is shut off during the update process, the camera may become inoperable.
Before starting the update, with the camera body turned off, attach the lens to the camera body.
Remove the memory card from the camera.
Do not connect the main body with any external devices; the camera body should be connected to the computer only.
Software Update Procedures
1. Download the software for the update.
Please download the file. >Download Page
Save the downloaded file to the desktop of your computer (recommended).
*For Windows® 8.1/10:
With the initial settings of Internet Explorer, files downloaded using the [Save] button are saved in the [Download] folder.
Please open the [Download] folder and find the downloaded file.
Refer to your computer's instruction manual, etc. for details.
2. Launch the downloaded software (on the computer).
Please perform the update process after closing all other applications and software.
Double click the downloaded file "Update_A036_2875_Ver03.exe" and "Lens System Software updater" will start.
3. Check the setting of the USB connection (on the camera body).
1. Turn on the camera.
*If the camera has already been turned on, turn it off and turn it on again.
2. Select "Setup" from "Menu" on the camera body, and select "USB connection".
Check that the setting "USB connection" is set to "Mass storage."
If the setting is anything other than "Mass storage," set it to "Mass storage."
4. Connect the camera body to the computer.
1. Remove the memory card from the camera first.
2. Connect the computer and the camera body with the original USB cable.
If the USB connection between the computer and the camera body is not detected, the message "The camera was not detected" will appear on the computer.
Try the following.
・Unplug the USB cable and try to connect it again.
・If the computer has multiple USB terminals, connect the cable to another USB terminal and try again.
3. Check that ![]() is displayed in the task tray on the lower right of the computer screen at this point.
is displayed in the task tray on the lower right of the computer screen at this point.
It may not be displayed depending on the situation. In this case, move to 4 without taking any action.
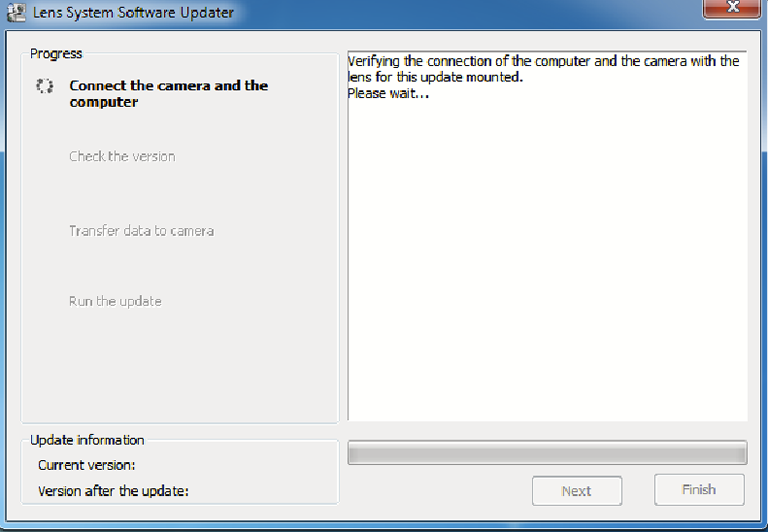
4. After checking the display, click the "Next" button, and the screen will change as shown below.
After this, do not turn off the camera body until the update is complete.
Depending on the camera model, it may take several minutes until the screen changes.
If "The update is not available for your lens" appears, check that the "Lens System Software updater" launched supports the lens attached to the camera.
*When the message is displayed even if you have launched the correct "Lens System Software updater" , please finish the "Lens System Software updater" , unplug the USB cable, turn off the camera, and perform again starting from procedure 2.
*If "Camera body was not detected" appears, check that your camera is an applicable model for the lens software update.
*Check that the computer and the camera are connected via the USB cable.
5. Check whether the update is necessary using the software.
Check that the "Current version" is "Ver. 02" or below, and click "Next."
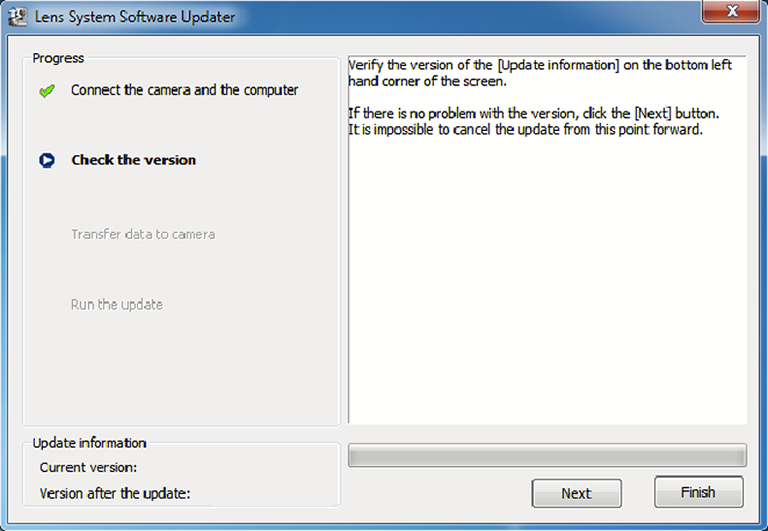
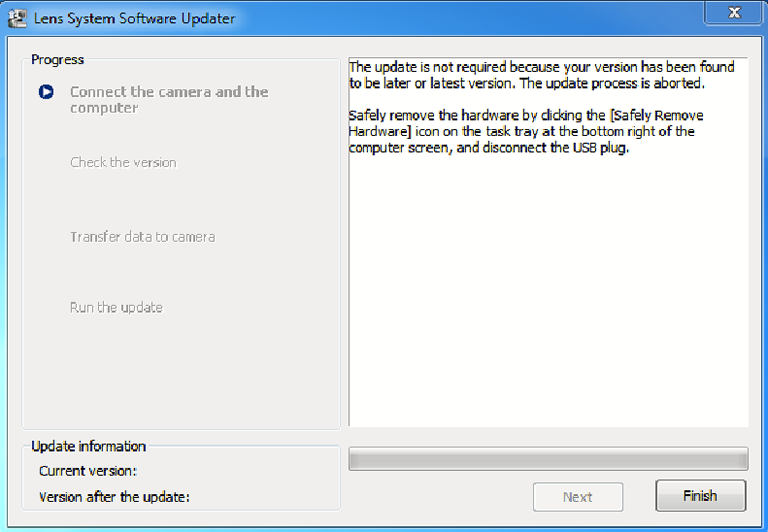
When the "Current version" is "Ver. 03," the update is not necessary.
Disconnect the USB connection in accordance with the message, and click "Finish."
Turn off the camera body, remove the battery pack or AC adaptor, and turn it on again.
6. Start the update process.
1. The transmission of the lens system software data will commence. A progress bar will appear while transmission is in process (around 5 seconds).
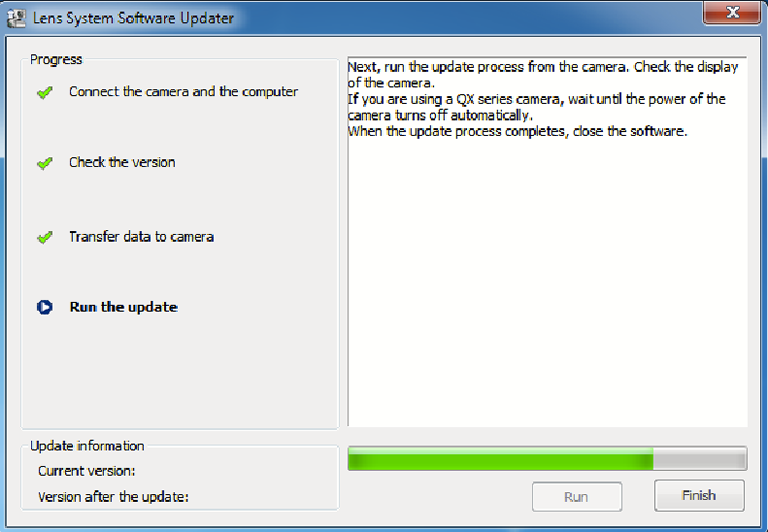
Do not turn off the camera body or unplug the USB connection while the update is in progress.
2. When the transmission of the lens system software data is complete, the screen will change as shown below.
Click "Finish."
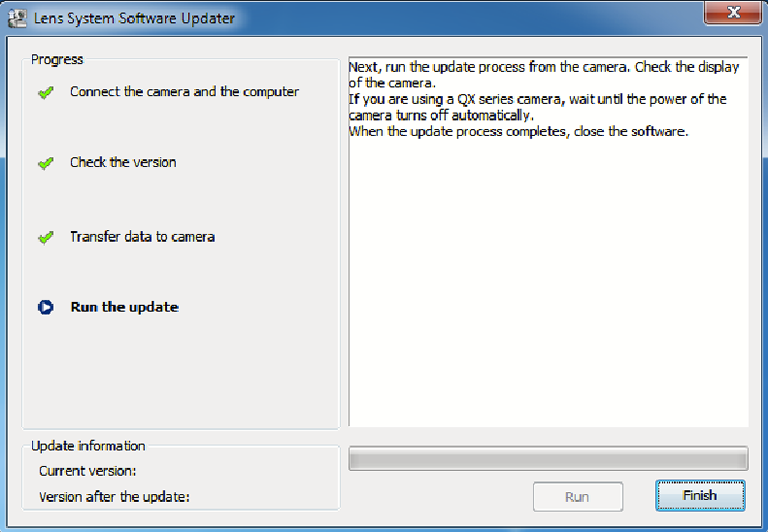
3. The update of the lens will commence.
"Lens updating" will appear on the camera, and a progress bar will be displayed while it is updating (around 30 seconds).
7. Finish the update process.
1. If "Lens update complete. Remove the battery and finish the update." appears on the camera, the update process is complete.
2. Click the "Safely remove hardware" icon ![]() in the task tray on the lower right of the computer screen, and disconnect the USB cable.
in the task tray on the lower right of the computer screen, and disconnect the USB cable.
If the icon is not displayed, move to the next step without taking any action.
3. Remove the battery pack or AC adaptor, and turn it on again.
8. Check the version of the lens system software (on the camera body).
Select "Setup" from "Menu" on the camera, and select "Version."
Check that the version of lens system software is " Ver. 03."
The update process is now complete.