How to Shoot in the Dead of Winter
Ed Heaton transforms dreary frozen landscapes into eye-catching images with his arsenal of Tamron lenses. |
Article by Jenn Gidman
Images by Ed Heaton |
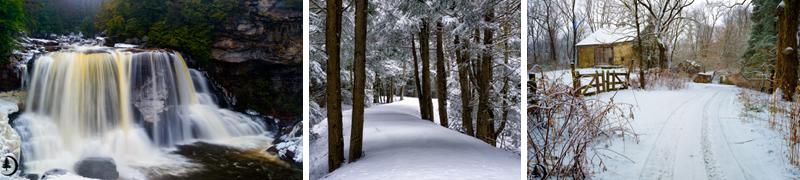
Ed Heaton is accustomed to shooting in cold weather. The Pennsylvania photographer teaches a winter photography workshop every year at Blackwater Falls State Park in West Virginia, and he regularly ventures there (and to other local tundras) for his personal photography.
|
The challenge: harnessing the dreariness of winter to create stunning images. To help him in his wintry wanderings, Ed uses the compact Tamron SP 70-200mm (which he calls his "go-to lens") and, more recently, the SP 24-70mm VC lens. "They're both great glass, and I know they're going to focus fast and create sharp images," he says. "That's important to me when I'm shooting." |
Check out Ed's tips here for transforming a bleak winter day into a beautiful winter wonderland of photos. |
Prep for the cold weather.
People who go out to shoot on a winter's day might not normally be cold-weather shooters, so they might not adequately prepare. I've seen guys come out with barely anything on and I'll tell them, "Hey, you're going to get cold!" They say, "Oh, no, I never get cold" - then two hours into the shoot they're freezing. Dress in water-resistant, insulated layers, so if you get hotter or colder, you can take those layers off and then add them back on. I also wear a hat (a tremendous amount of body heat escapes through your head), a nonbulky pair of gloves, and a solid pair of waterproof boots. |
Being out in the cold is extremely hard on batteries. I always try to keep my batteries fully charged, and I carry a spare battery with me on the inside of my jacket to keep it warm. Having a sturdy, water-resistant camera bag also helps. When you're working in a wintry environment and you've got on a shoulder bag or backpack, you have to set your bag down at some point, and it will probably be in the snow. You want it to keep the moisture out as much as possible. You also need some sort of protection on your camera, whether it's a plastic bag, umbrella, or high-tech rain cover. |
Overexpose for a brighter perspective.
Your camera records 18 percent gray, and that's how it's designed to read. But snow reflects a lot more than 18 percent. So if you shoot your exposures right on the money when you're shooting snow, you'll get gray snow, which is awful. I always start anywhere from 1/2 stop to a full stop overexposed. This allows you to get a little more light to make your snow whiter and brighter. I use this same method when shooting fog.
|
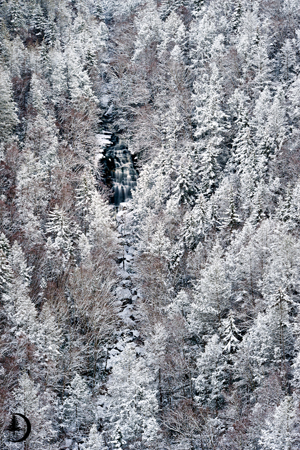
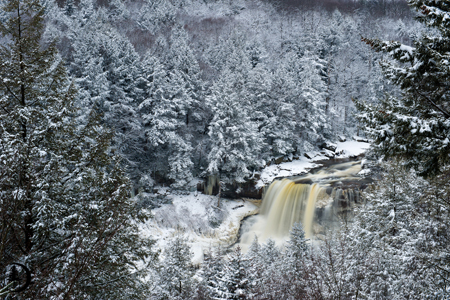
Work the sky to your advantage
I personally like to shoot at the edge of storm fronts, meaning just before the storm hits or right after the storm starts to clear, which gives me dramatic winter skies. However, sometimes you don't have that advantage. Overcast and dreary skies can be a challenge, but you can create some extremely moody images during this time. I don't try to put a lot of sky in my composition in these cases - it doesn't do a whole lot for your image. Instead, get in tighter on your subject, focusing your viewer's eye on your subject, not on the sky. |
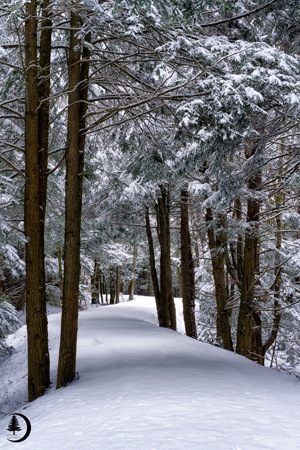
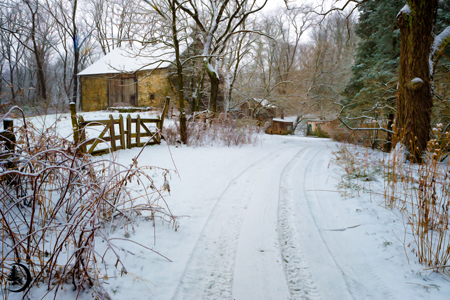
Follow the lines and patterns of your winter wonderland for compelling composition.
I'm always looking for small scenes with elements of design where I can. For example, I use a lot of natural lines in my photos, like tracks or trails. One of my favorite shots is a path in the forest at Blackwater Falls. The path directs the viewer's eye, and the shadows are subtle, just enough to create depth and make the image not look quite so flat.
|
I also try to notice shapes or repetition of subjects. If you see icicles, for instance, they're not singled out - they're usually in a group, so you get that repetition of an icicle line on which you can build your image. Ice patterns are nice, too. There are many things to shoot. You just need to keep an open mind and creative eye. |
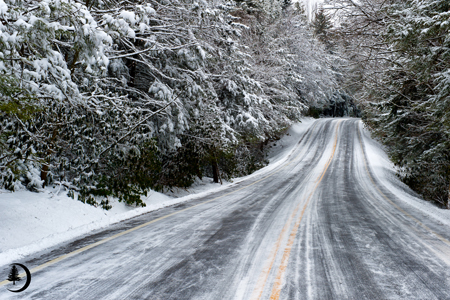
Look for natural touches of color to complement the winter landscape.
Incorporating a touch of color or contrast adds a bit of balance or weight to your images. It might be an overall blah-looking day, but if you can get a rich, earthy tone in there, or a person wearing a bright red coat, it attracts the viewer's eye.
|
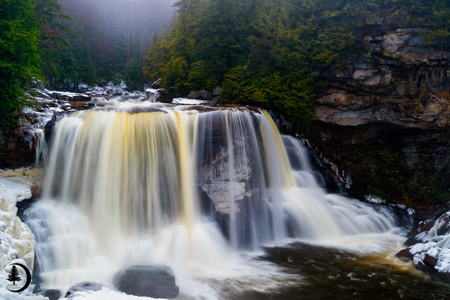
There's a lot of tannin in the water at Blackwater Falls. Tannin is a chemical that comes from the pine trees in the runoff and then filters into the creeks, which is why you see these rich yellows and browns. Plus, if you drag your shutter enough, you can get a 1-second or 2-second exposure of the waterfalls. If there's not a lot of wind, you'll capture beautiful, creamy, cotton-candy-like waterfalls, and everything else looks great, too.
|
Use filters.
I'm old school. In my camera bag, you'll always find a polarizer, graduated neutral-density filters, and a variable neutral-density filter, where I can dial in anywhere from 2 to 8 stops. I always have a polarizer on when I'm shooting winter waterfalls and creeks. For shooting winter skies, I still use split neutral-density filters for a lot of my shots.
|
Use HDR to enhance a dreary day.
I've been doing HDR for a while, and it always lends an extra card for you to play on a dismal-looking winter day. I took a shot from an overlook that was over one of the Blackwater Falls canyons. I could see the beauty of that sky with my naked eye, but when I took a single frame, the sky was so blown out and white that it wasn't really a usable image. By shooting it as an HDR shot, I could expose for the foreground, then expose for the sky. What happens when I put them together: I get a lot more dynamic range, and the sky looks pretty cool.
|
Give your camera a break when you're done shooting.
This is a tip many people forget when they're shooting in cold weather. After they're done for the day, they'll climb into their car or go inside the house, leaving their camera bags wide open with the heat blasting. This is going to create condensation - a huge no-no for digital cameras. When I come in, I leave my camera and lenses and everything else zipped tightly in my bag. I don't go into it until two or three hours later, when it's had a chance to slowly warm up. |
To see more of Ed Heaton's work, go to www.edheaton.com. |