Enewsletter
December 2011
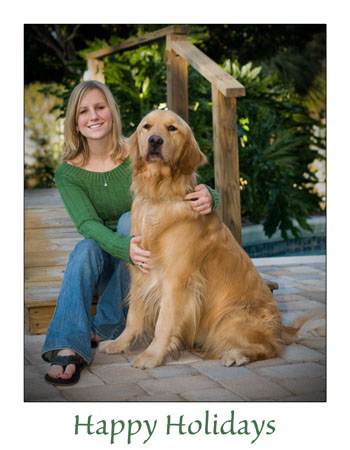
Creating Memorable Photos for Your Holiday CardDoug Sahlin shares his tips and techniques using the Tamron 18-270mm VC PZD lens. |
Article By Jennifer Gidman Images by Doug Sahlin |
Coming up with the image for your annual holiday card can feel overwhelming. Not only are you required to conjure up a composition that will impress your family and friends you also need to inspire your significant other or extended clan to keep their happy faces on for the duration of the shoot. |
Creating a standout holiday card, however, isnt nearly as elusive as nabbing that dirt-cheap plasma TV on Black Friday. Strategize on your setup, focus on what makes your subjects unique, and use a versatile lens such as the Tamron 18-270mm VC PZD, according to photographer Doug Sahlin. |
The 18-270 has a cropped-frame sensor, so if youre shooting with a focal length anywhere from 50mm to 80mm, it gives you the 35mm equivalent of 80mm to 105mm perfect for a head-and-shoulders holiday portrait, says Sahlin. The variety you can get with the lens is also great if youre shooting a series of pictures: You can be shooting an image of Grandma, then zoom out to get something the kids are doing across the room. Plus, some people may not know that when you zoom in, you need a faster shutter speed to compensate for camera movement. If you forget and shoot at a slower shutter speed, Tamron Vibration Compensation can save the image. |
The Setup |
Bringing your holiday card image to fruition means ensuring complementary lighting and backgrounds. Avoid shooting straight-on with an on-camera flash if youre photographing indoors, which produces harsh lighting, says Sahlin. Try to set up the picture near a large window so you get soft, natural light. If youre going to use flash, use an auxiliary flash with a diffuser or bounce it off the ceiling. If you shoot with natural window light, a car sunshade makes a great impromptu reflector: Use the gold side of it to throw some warm light back into the shadow side, or use the silver side so you dont change the color of the light. |
Dont detract from your subjects with a background thats too busy. For instance, if Im shooting outside, Ill often place my subjects against plain green shrubbery, says Sahlin. You can make the shot environmental, though, especially if youre a professional and sending the card out for business purposes. For instance, if your card is going to feature the elder statesman of the family, sit him in the library, about 6 to 8 feet away from the wall. Take a head-and-shoulders shot of him at f/5.6 the library books will be in focus just enough without taking away from your subject. |
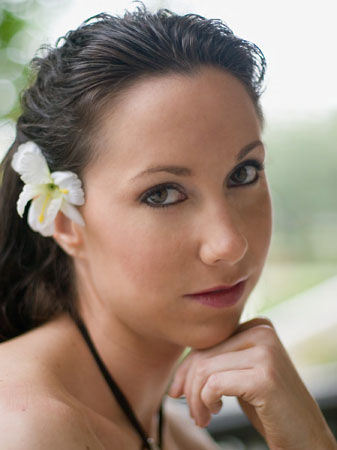
Your direction will differ depending on how many people are in the shot. If youre shooting one person, for example, she doesnt have to look directly at the camera ask her to look at something shes holding in her hands, or to look out of the frame to imply shes thinking about someone or something, Sahlin explains. If youre photographing a couple, tell them to look at each other.
|
Group photos may require more organization, but you dont want the image to resemble a lineup photo, either. If one member of the group is pretty short and light, ask the tallest people to stand and the next-tallest group to kneel, says Sahlin. They can put their arms out and hold the smallest person in the group horizontally, so there are three different levels shown in the photo. |
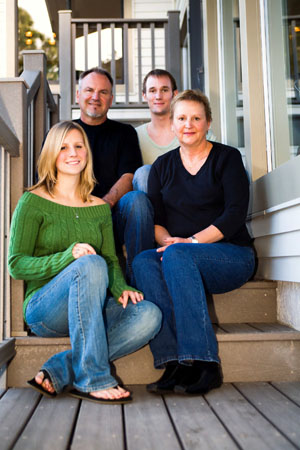
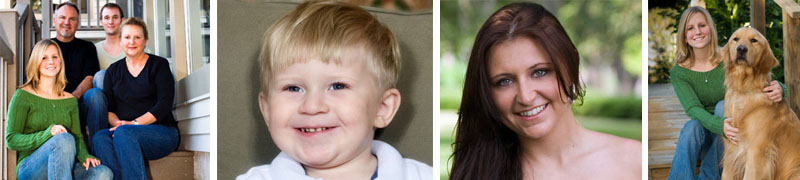
Use color and lines to your advantage. For a family of four, Sahlin stacked them on the outside steps and shot them from a low angle so that the viewers eye would be drawn from the moms black sweater to the dads black sweater, as well as from the daughters green sweater to the sons green shirt. If I had positioned the two younger people on one side, the composition would have been static, he explains. The lines from the side of the house and the deck also served as a lead-in and added perspective.
|
Nail the focus for a memorable holiday-card image. The eyes are the window to the soul when youre shooting a portrait, says Sahlin. I shoot with a single autofocus point and prefocus on the subjects eye (the one closest to the camera). Put the single autofocus point over the eye, press the shutter button halfway to achieve focus, then move your camera to recompose your shot.
|
When shooting a group, if you focus on the nearest person to you, the people in the back are going to blur out and not be quite as sharp, even if youre shooting at 7.1 or 8.0, he adds. Focus on the middle group and youll have enough depth-of-field to take care of the people in the back and front. |
Show Your Subjects at Their Best |
You want a natural portrait, not a contrived shot, for your holiday card, so invest some time in loosening your subjects up. Tell them its a no-blink zone then take a picture or two, because everyone will be smiling, Sahlin advises. Review the LCD monitor to make sure no one was blinking. If you notice someone isnt smiling when you review the image, call him by name and crack a joke. If you do all of this with the viewfinder to your eye and keep shooting, the law of averages says youll get some great shots. |
Dont use props unless they jive with your subjects personalities. Dont bring out a holiday wreath just because youre using this image for a holiday card, says Sahlin. Show what makes the people in the image unique. For example, if the patriarch of the family is always smoking a pipe, have him hold the pipe in his hands; if one of the children plays baseball, add her baseball glove into the picture. |
Another way to showcase a subjects personality: Zoom in on particular parts of the body. If youre shooting a single subject and hes a woodworker or a guitarist, for example, photograph just his hands, says Sahlin. |
Finalizing Your Holiday Card |
Think about how youre going to put your card together as youre taking the shot. If youre going to use the whole photo as the face of your greeting card and you plan on adding text somewhere on the card, leave a little dead space at the bottom of the image for the greeting, says Sahlin.
|
If youve already taken the shot but cropped the image too tightly, Sahlin suggests extending the canvas, which allows you to increase the space around the image without modifying the image itself. People often forget to leave breathing room when theyre zooming in, he says. Then, when they have to crop the image for the card, they may end up losing some of it because the holiday card aspect ratio (often 4:5) isnt the same as the cameras aspect ratio of 2:3.
|
Add a simple border for impact. Use a ½-inch white border, for example, on three sides, with a 1-inch border on the bottom so you have room for text, says Sahlin. I added a white border to one of the portraits I took of a young girl. I then used the Eyedropper tool in Photoshop to sample the green from the girls sweater, which I then used as the text color.
|
Finally, dont limit yourself to portraiture for your holiday cards. Put together a series of photos and landscapes from the area you live in, says Sahlin. Or turn something like different-colored leaves or a flower with dew into another type of natural-looking image for a holiday card. I also like to do a walkabout with my camera. I can find really interesting subjects in store windows, for example, when the stores are closed but the lights are still on, especially after Thanksgiving when they start displaying the holiday items. All of these ideas make your holiday card stand out from more conventional cards. |
For more of Doug Sahlins fine-art landscape and nature photography with his partner Roxanne Evans, check out their website at www.dougplusrox.com and their Facebook page. |
|