
Enewsletter
How to Photograph Waterfalls
Ed Heaton offers his tips for turning gentle cascades and raging cataracts into compelling images.
By Jenn Gidman
Images by Ed Heaton
Professional nature and landscape photographer Ed Heaton is a veteran at shooting waterfalls, whether it's in the workshops he holds every year in the Smoky Mountains or closer to home at Ricketts Glen State Park. Ed has mastered his techniques for harnessing the light and "reading" the waterfalls in front of his camera to create stunning photos with his Tamron SP 70-200mm VC and SP 10-24mm wide-angle lenses. He shares a few of his favorite tips here.
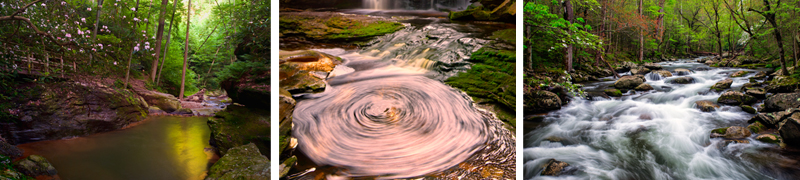
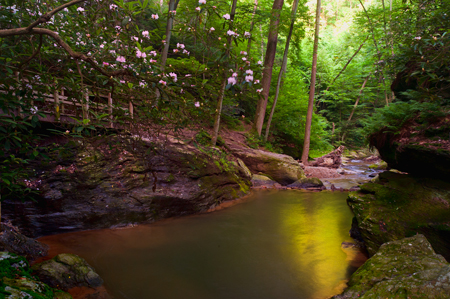
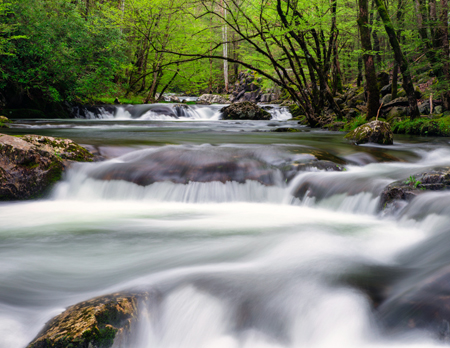
Create depth in your images.
Whenever I take a picture, I'll first check out the scene for leading lines and interesting foreground elements I can incorporate to add depth to the photo. For this image I took during the first week in June, the rhododendrons were in bloom, which I thought would serve as a terrific background element. I got way down low in the creek and positioned the waterfall at the "beginning" of the image, as a cascade in the foreground, and let that cascade lead the viewer into the picture and the rhododendrons in the background.
Change your perspective in one of the simplest ways possible.
A goal of mine when taking pictures of waterfalls is to make each photo different, and one way you can do so is by altering your perspective. For this peaceful, serene image, which is slightly different than the other ones shown here, all I had to do was pivot my body after taking the previous picture with the rhododendrons.
This was directly behind me when I was shooting that first photo: In the first photo the rushing water was coming toward me; in this photo it's flowing away from me. It's a much more calming image, and all I had to do was turn my body for a new angle. Always look around and behind you after you take a photo to see how you can change up a scene without even moving from your spot.
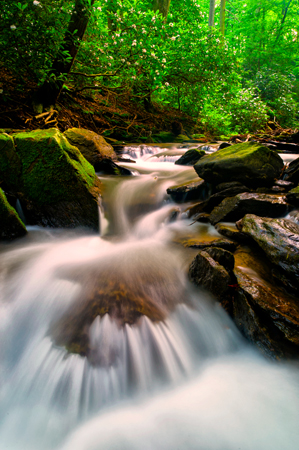
Use the "lines of the land" to your advantage.
This is probably one of my favorite shots from this spring's trip to the Smoky Mountains. I usually save this spot for last, and it just so happened that the lighting was perfect this year when we shot there.
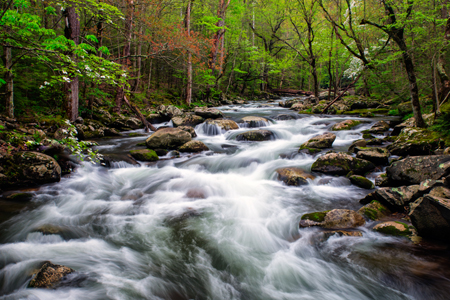
I have what I call "controlled chaos" in this image: There's so much going on in the picture with the various elements, but I keep it all contained within the lines of the landscape. I use a nice C-curve as the anchor, with a dogwood on the left-hand side, as well as some maples starting to bloom on the left, just past the dogwood. The balancing act on the right-hand side is more dogwood, plus that spring green to finish it off. What really attracted me to this scene, though, was the movement of the water.
Use HDR to your advantage.
Sometimes the only way I can pull off a photo I want to take, especially when I'm deep in the forest with varying light and brightness levels in the elements, is to take an HDR photo. This image here with the sunburst, for example, was a difficult image to capture: To get the complete dynamic range here, I had to shoot multiple images and then splice them all together.

To capture the sunburst, I shot it at one exposure setting; then, to get all the detail down in the darker area—and to drag the shutter long enough to get that spinning eddy—I had to use a different exposure. I took a series of five photos at different exposures, then merged them together.
Another way you can control that varying dynamic range is to crop your image, perhaps photographing smaller waterfalls or isolating other neat elements in the scene.
Look for the right light—and don't be afraid to use a filter.
It's not within your control, but my favorite days to shoot waterfalls are the soft, overcast ones. Many people see a cloudy day and don't think it's a good time to head outside and shoot, but it's just the opposite. All you have to do is throw a graduated neutral density filter on, for instance, and dial your exposure way down to get that dreamy, soft look. For this image I captured in April in the Smoky Mountains, a polarizer actually did the trick. Polarizers can cut down on glare and slow down your shutter speed to let less light in; that can take away one to two stops of light.
And while I do use my histogram to make sure I've exposed the scene correctly, I'm more likely to rely on the highlight warnings you'll find on most DSLRs, or what are called the "blinkies." They allow me to see exactly what's being overexposed, so I know what I need to adjust for and what elements I have to shift. Take that HDR image with the sunburst and swirling eddy for example: If I had just read the histogram for that photo, the sun was naturally going to be overexposed, so it would have simply indicated to me that the entire scene was overexposed. But with the blinkies, it shows me exactly what's overexposed, and because I'm OK with the sun being bright—because it is bright—I don't worry about the entire scene being overexposed.
To see more of Ed Heaton's work, go to www.edheaton.com.