Enewsletter
October 2014
Taking Adventure Travel and Nature PicturesSean Arbabi uses the Tamron SP 70-200mm VC and SP 150-600mm VC lenses to show the flavor of both exotic and local destinations. |
Article by Jenn Gidman Images by Sean Arbabi |
Whether Sean Arbabi is on assignment for a travel magazine or camping in Yosemite for a family backpacking trip, out in nature is where he feels most at home. "I'm a mountain person, a lake-and-granite-loving person," he says. "I get outside to these remote places and my blood pressure drops. It takes your mind away from the other, more stressful parts of your everyday life. And traveling is amazing in its own right: It's one of the best educations you can ever get." |
Although he's captured photos as far away as the jungles of Borneo and Argentina, Sean says that photographers can find adventure travel photo opportunities right in their own backyards. "I live in California, which has such an amazing diversity of landscapesbeaches, major cities, wetland areas with bald eagles, 14,000-foot peaks with rivers that freeze over, redwood forests, deserts. When I started out 23 years ago, I didn't have a lot of money for a travel budget, but I was able to put together a portfolio just near where I lived." |
Sean's goal when he's taking adventure travel photos is to offer a sense of place by capturing a mix of images. "If I'm in the Florida Keys, for example, I might photograph a mangrove forest at sunrise, then head to a local restaurant at lunchtime to take a chef's portrait, then go out later in the day to capture a fly fisherman in action," he says. "You get to see all different parts of a destination and challenge yourself to be creative. I love to make graphically strong compositions, but I also want it to be as realistic as possible, where the viewer says, 'I'd love to visit that place." |
On his recent adventure travel trips, Sean brought along the Tamron SP 70-200mm VC and the new SP 150-600mm VC lenses, which give him the range, image quality, and portability he needs. "The 70-200 is incredibly sharp and fast at F/2.8," he says. "And I'm loving the new 150-600. It's also super-sharp and feels so solidly built, yet it's light enough to handhold. To take a 600mm lens backpacking up at 10,000 feet and not weigh me down is awesome. Plus, having that Vibration Compensation (VC) feature on both is invaluable. It's handy to be able to turn it on if I'm handholding and need to keep image shake at bay, or if I'm in a location (like in a kayak or another tight space) where I can't bring a tripod." |
Read on for some of Sean's tips on how to capture eye-catching adventure travel and nature photos, whether you're on the other side of the world or in a nearby national park. |
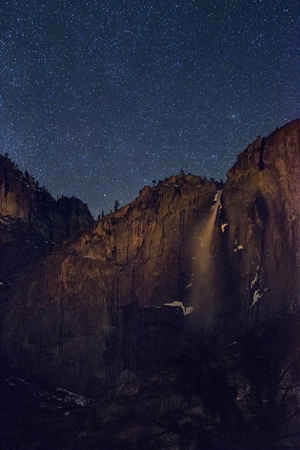
Take pictures out in nature, far from the city lights.
|
I took this picture with the 70-200 mounted on a tripod. The balance of the warm glow on the waterfall (probably light from the hotel that's in the valley) and the cool blue of the sky worked well for this image. I shot this at F/2.8 for 13 seconds at ISO 6400. People often think they can just use autofocus for a shot like this and focus on infinity, because the stars are so far away, but I manually focused, looking through the viewfinder until I got those stars tack-sharp. To get the stars to be pinpoints, the shorter your exposure should be the more you zoom in. That's why I went up to ISO 6400 to get that 13-second exposureat 30 seconds or a minute, I'd start to see the movement of the stars and get star trails. |
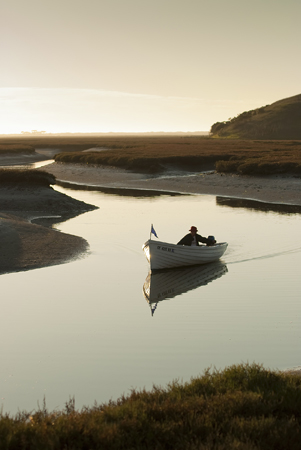
Use the natural curves and lines of the landscape to your advantage.
|
There wasn't a lot of color to this particular sunset, but that's what I actually like about this image. That light sky was simply reflecting on the water, almost creating a kind of backlighting on the water. The serene, peaceful tone is different from your typical sunset shot. I think the colors might have distracted the viewer from the nuances of the curves in the distance and the muddy banks. Sometimes simple compositions are betterfewer elements in a scene produce a stronger image because you're focusing on your subject. |
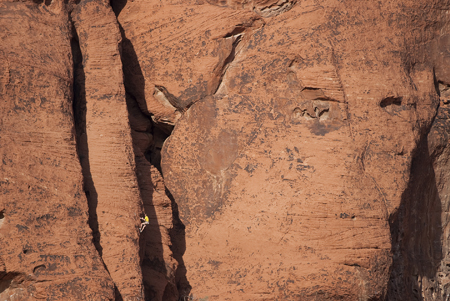
Look for ways to make your subject pop in the image.
|
Composition is not only about what you want to include, but what you don't want to include: Even though my subject was tiny, I filled the frame with this massive rock wall because the tones of the rock were so nice, and used him to show scale on the bottom left of the image. The yellow shirt he was wearing certainly helped him pop, but one other thing helped make this a more visually compelling photo: There were two lines of shade on the left side, and the climber was positioned where he was just popping off of the frame in the shade. Had he been on the rock face in the sun, you still notice him, but it wouldn't have been as strong of a contrast. |
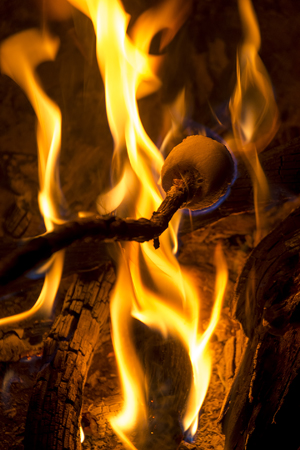
Planning your adventure travel photos are important, but embrace the spontaneous moments, too.
|
It's best to not shoot when the fire has just started, because the wood hasn't burned and the fire hasn't reached its peak. But if you try to take a picture of the fire at its peak, it may be too hot and so bright that it overwhelms everything around it. You want to wait for when it hits that groove so the fire is still going strong, but the wood has burned nicely and has that red ember glow. It's similar to photographing fireworks: The initial burst is really bright, but then they hit that ideal exposure point as they're falling. |
The blue glow on the dark side of the marshmallow separates the marshmallow from the background and gives it some shape and dimension. When you take four or five of those tiny details and add them to your picture by fine-tuning the exposure or adding those little highlights, they take your picture to another level. |
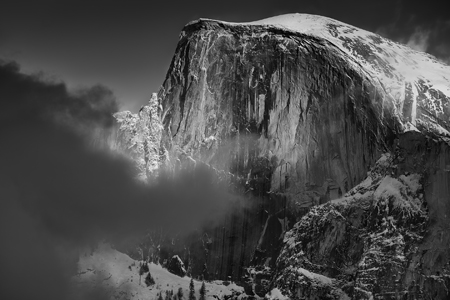
Convert your images to black and white for a different feel.
|
So in post-processing for this image, I applied a red filter to give me that same dramatic look. The combination of the cloud rolling in, the light on the rock face, and the snow also added to the contrast. It came out incredibly different from the color version, with an almost ominous feel. |
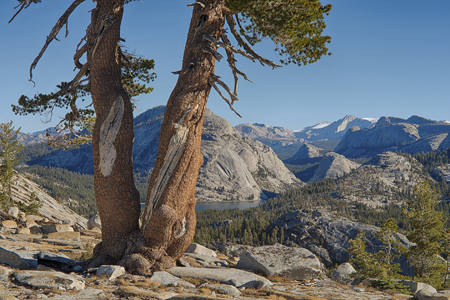
Use HDR to enhance your photos.
|
I also love using that zone system I mentioned earlier in my color images to show all the range of detail in the shade and highlights. That's why I'll create an HDR (high dynamic range) image in my nature and travel photography. Many people shy away from HDR, because they're afraid the resulting images will be too surreal or funky. But HDR can produce many more stops of light than what your camera canif you do it right, it can make your image look very realistic. |
I shot it at F/25 and did three exposures to get the full range of coverage, combining them afterward in Photoshop. Those three exposures allowed me to get all the detail in the shade on the tree, while also not losing the detail in the granite rocks in the sunlight. |
To see more of Sean Arbabi's work, go to seanarbabi.com. |