Enewsletter
February 2014
5 Tips for Stunning Macro PhotographyDavid Guy Maynard offers suggestions on how to achieve sharp, beautiful macro images. |
Article by Jenn Gidman Images by David Guy Maynard |
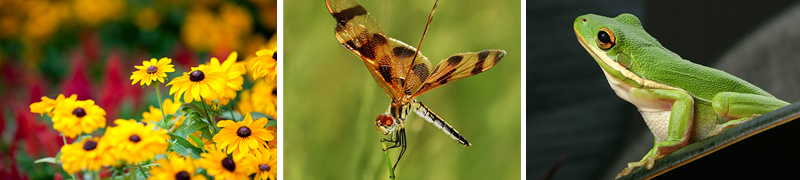
The detailed texture of a tree frog, the intricate patterns of a dragonfly, a bouquet of sunflowers against a beautiful soft background-these are the types of eye-catching subjects that Florida photographer David Guy Maynard seeks out when he's in a macro mindset. His years of experience in the macro domain help him successfully capture the images in his mind's eye, but his five tips here will help any aspiring photographer bring life to their own macro photos. |
Choose a "true" macro lens with 1:1 maximum magnification or a lens with quality compression.
|
Using a lens with great compression is another option if you don't have a true macro lens at your disposal. For example, I also use the Tamron SP 70-200mm VC lens when taking florals for the nice, supersoft bokeh I'm able to get behind my plants and flowers. |
I took this particular image of a hyla frog getting ready to jump to its next leaf with the 90mm VC. The frog is really tiny, maybe a half-inch long, but I was able to get a really sharp image of it because the 90mm is a true macro lens with that 1:1 magnification. You can see every tiny bump on the frog in incredible detail. |
The Vibration Compensation (VC) feature on the 90mm Macro is also a handy feature. For macro images, you want to be steady when you're that close, and the VC makes a big difference. For the hyla frog, I wasn't using a tripod (and often in macro you're not, because you're hand-holding so you can go where your subjects go), so there was the possibility of camera shake. The VC allowed me to still get a tack-sharp image. |
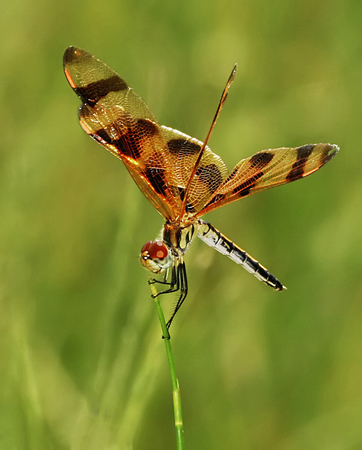
Use manual focus and the "sway" technique.
|
A situation like this is when I'll use the "sway" technique. If you're back quite a distance from a stationary subject with a macro lens, the autofocus usually works fine. But what I usually do on a breezy day like this one where my subjects might be moving slightly is go into manual focus, get really close to my subject, and wait for it to swing like a pendulum into focus, past it, then back again. I take the picture right as it's in sharp focus, then wait for it to come back again before I take another one. It's a matter of timing, and it helps I have lots of experience doing it this way, but I find most photographers can have success trying this technique. |
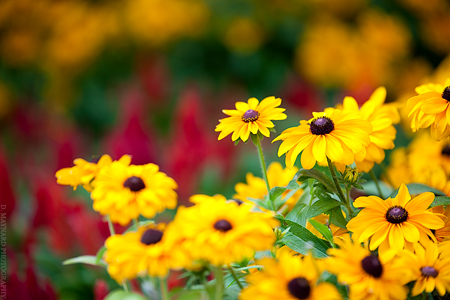
Understand depth-of-field and use it to your advantage artistically.
|
I didn't want to do that in this case. Instead, I decided to use a more shallow depth-of-field to subconsciously control the eye of the viewer and put it right where I wanted it. The beauty of this shot is that only the trio of flowers that sweep down the right-hand side are in focus. The viewer's eye is drawn to those three flowers, with a colorful banquet of softness around them. If the red flowers in the background had been in focus, the eye would have been drawn to those first. |
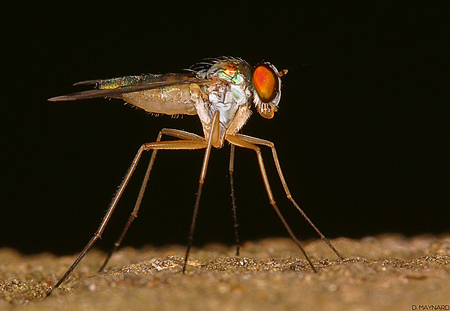
Use flash for deeper depth-of-field.
|
They're really tiny creatures, smaller than a mosquito. I was able to capture this one, which was maybe 1/8 of an inch, on a piece of tree bark. I used the Tamron 180mm Macro lens with a 3x teleconverter to get really, really close to the insect. The problem with that magnification, though, is you can get paper-thin depth-of-field. Look right under the fly: In the foreground, it's soft; directly under its feet, it's sharp; then it goes soft again as you look behind it. That's how deep the depth-of-field was. The only way I was even able to get it that deep was to pound it with light. I took this picture at F/22 and used a little ring light I often use with macro photography, which helped me distribute the light more and get a deeper depth-of-field. |
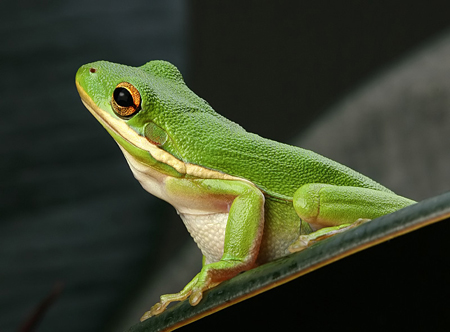
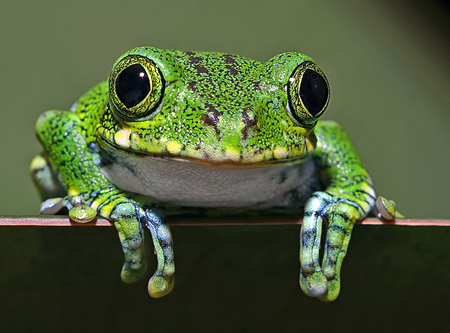
Get level with or below your subject when composing the shot.
|
This is an easy thing to remedy. Just change your perspective, either by getting level with your subject or crouching down so you're shooting up at it (bugs especially look much cooler this way). When I took this picture of a big-eyed tree frog, I made sure I was level with it, so its eyes were directly on me. That simple change of where I was in relation to the subject really showed off its personality. Taking pictures from this perspective incorporates you into their world, instead of just making them an aside in your world. |
To see more of David Guy Maynard's images, go to www.dmaynardphotography.com. |