Enewsletter
August 2014
How to Create Strong Images of City LandscapesWith a prepared mind and Tamron's SP 70-200mm and SP 16-300mm VC PZD lenses, Sean Arbabi takes photographic chances in his city scenes. |
Article by Jenn Gidman Images by Sean Arbabi |
Sean Arbabi got an "F" in his first photography class in high school, but he got an "A" the semester after that and has been taking pictures ever since. The commercial travel photographer-who counts Outside magazine, National Geographic Traveler, and Self as a few of his big-name clients-is constantly on the lookout for new photographic perspectives while on assignment and in his personal work. "You're often limited with time and budget, especially when you're on assignment, so you have to come away with great images, rain or shine," he says. "You need to figure out the best ways to get those images." |
Sean uses the Tamron SP 70-200mm and new 16-300mm VC PZD lenses when he's on the road, and he's looking forward to trying out the new 150-600mm VC lens he just received for upcoming adventure travel and nature images. "I love all of the Tamron lenses because they're well-made but still feel solid in your hand but lightweight," he says. "The 70-200 is such a fast lens with its maximum F/2.8 aperture. The 16-300 is a compact lens with a great range-I can bring it with me into places where I'm limited in terms of space, like a kayak. I also tested the Vibration Compensation (VC) feature on this lens, and it works terrific when taking handheld pictures." |
Check out a few of Sean's city landscapes below and read about how he captured them. |
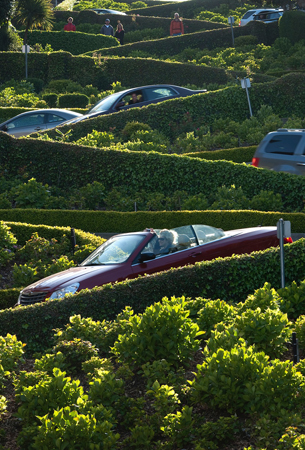
Capitalize on the natural lines and curves of a city's architecture and urban landscapes.
|
The other thing I used here to my advantage was the lighting. I waited until the sun was setting but not completely-it was still high enough to backlight the bushes and cars while the rest of the image falls into shade. Those highlights on the top of the bushes and the cars helped me define the street and eliminate distractions, because the viewer's eye is drawn to the bright parts of the scene. The 70-200 enabled me to zoom in and crop other extraneous elements out, like some buildings that were off to the side. |
Create strong graphic images out of ordinary city scenes and objects. |
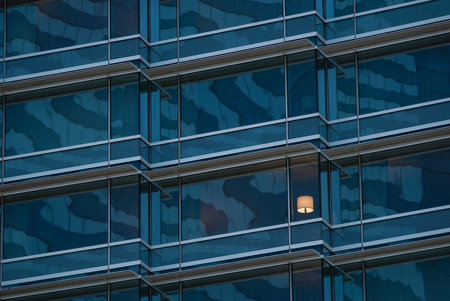
That's what happened while I was on assignment at CityCenter in Las Vegas. I was shooting some scenes outside the Aria resort and casino in the late afternoon when I noticed someone flick their lamp on in one of the rooms. I also saw the Vdara Hotel reflecting in the Aria's windows, which was a great added touch. I was able to get a powerful graphic image, with the lines of the building going in one direction, the reflections of the Vdara going in another direction, and that one lamp drawing the eye into that section of the photo. Plus I had the contrast of the warm light from the lamp set against the cool tones of the building.
|
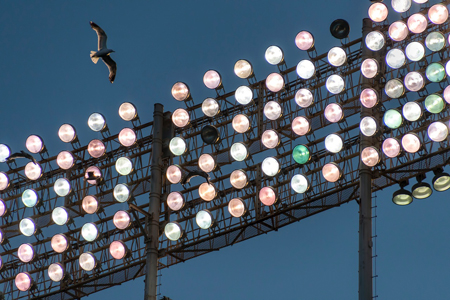
Other times you may have a visual in mind, but you'll need to wait for just the right moment to bring it all together. I had taken my family to an Oakland A's game and brought the 16-300 along to test it out. I spotted this bank of old stadium lights, which had just turned on in the late afternoon. First I took some pictures of just the lights, but I soon realized that I needed another element to balance the image. |
Seagulls were flying all around, so I decided I'd try to get one in the picture. Of course, they didn't cooperate and go exactly where I wanted them to go right away, so I had to just keep panning and recomposing. I finally got this bird in the frame-what makes it really stand out is the backlighting on the gull's feathers. I shot it at 1/8000th of a second at F/6.3, ISO 800. If I had used a slower shutter speed, I couldn't have stopped the bird and the lights behind it without getting blurs of light. I had to use that very fast shutter speed to get the bird in motion-and the 16-300 helped me get a tack-sharp image.
|
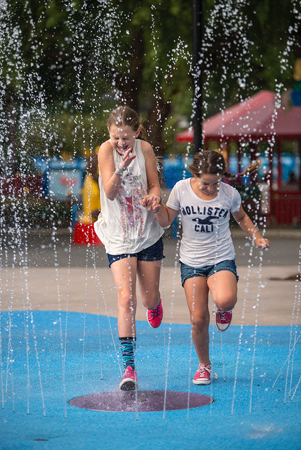
City photography doesn't have to be all about buildings and bridgescapture a slice of city life with images of people in action. |
For the sprinkler image, I had my daughters run through the water. I chose a very fast shutter speed to stop the water and them in motion. I could have used autofocus, but because there was water spraying in front of them and behind them, so the autofocus might have been fooled. Instead, I prefocused manually on the spot they were going to run through and waited till they hit that spot, then took a few pictures. I knew they'd probably have that type of reaction as the water sprayed them right in the face. I took this shot at 1/1,250 of a second at F/2.8, ISO 100.
|
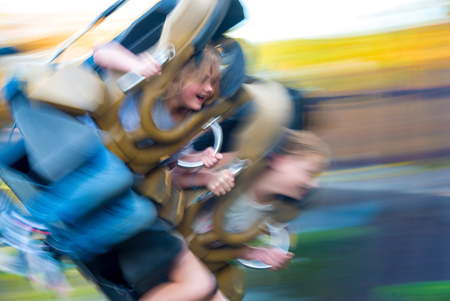
On the flip side, I used a slower shutter speed to capture my daughter on a ride with another girl. While fast shutter speeds work best for freezing a moment, slow shutter speeds create more of a blurred flow-an entirely different message. I wanted to capture that blur but still keep the girls' faces sharp so you could see them smiling and having a good time. It was hard, because the ride was moving left and right, up and down, going 0 mph one second, then 30 mph the next. I kept panning and shooting, trying to keep their faces sharp while still capturing that motion, speed, color, and sense of fun. I took it at 1/6th of a second at F/9, ISO 100.
|
Show parts of the city in silhouette.
|
The other part of what made this image is how I enhanced it in Photoshop. My goal when I use Photoshop is not to create something that isn't already there-it's to help the camera see what we see with our eyes. Usually you can do that with lighting and composition, but sometimes it's impossible-in this image, I couldn't fill-flash the city at the bottom of the image to brighten it. I also couldn't use a graduated neutral-density filter, because that only works well with wide-angle lenses, not when I'm shooting at the 200mm end of my 70-200. |
In Photoshop, I was able to go in and cut the contrast a bit: I brightened some of the shadows, then recovered some of those highlights so you can see those details in the clouds. I simply stretched the dynamic range. If you were standing right next to me, though, this is what you would've seen with your own eye. |
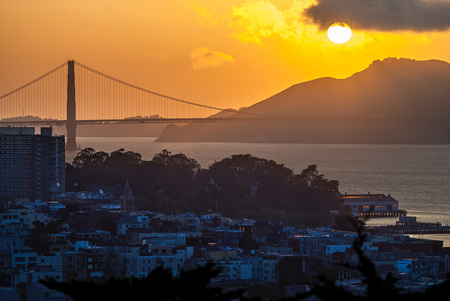
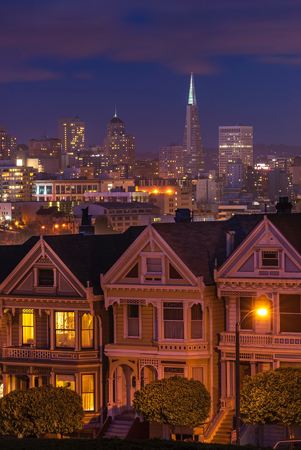
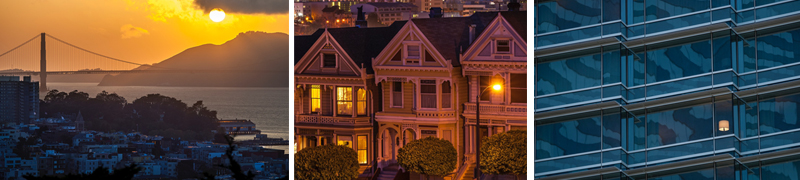
Capture the glow of a city at dusk.
|
The trick is to wait till about 30 minutes after sunset, when the ambient light of dusk balances with the artificial lights. You'll have about five to 10 minutes before those exposures start to separate again. I was teaching a workshop when I took this shot with the 70-200 extended to 155mm. The sun had gone down at 8:25, and I told my students to wait till about 8:55. Sure enough, that's when they started getting the images they wanted. I took this image at F/11, ISO 100; the exposure was 30 seconds, which captured the glow without overexposing or underexposing the sky. |
I also stayed cognizant of my composition for this image, because I'm always trying to keep in mind what editors and art buyers may be looking for. If I had moved much closer to the houses, I would have been going down a hill and wouldn't have been able to get the city and the Transamerica Pyramid in the background. With the 70-200, I was able to zoom in and capture the entire scene. I purposely left some sky up top-not for the fine-art aspect of it (though that turned out nicely), but because I thought the image could potentially work as a cover for a publication such as San Francisco Magazine or National Geographic Traveler. That negative space serves as a perfect spot to place the title of a magazine. |
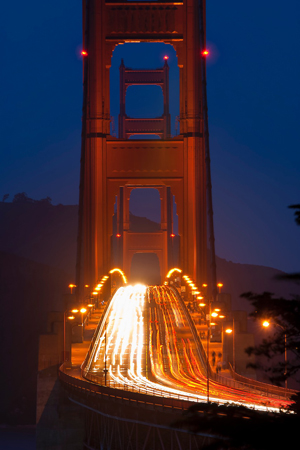
Try your hand at an evening time-lapse photo.
|
You want to use optimal settings for each scene you shoot so you can convey a certain message. Again, I waited till 30 minutes after sunset and shot it with an 8-second exposure at F/9, ISO 100. Beginning photographers often think they have to raise their ISO up in low-light situations, but that's not the case. Lower ISOs give you a rich color, a lot less digital noise, and more detail. |
But using that ISO required that longer 8-second exposure, which gave me the chance to capture all of the traffic heading over the bridge at dusk. I didn't want to shoot any longer than that, because the lights going over the bridge would have started to look more like a ghost-type of image. If I had taken that at 30 seconds or even a minute, you might have see more of the actual roadway glowing instead of the streaks of the headlights and taillights. |
To see more of Sean Arbabi's work, go to www.seanarbabi.com. |