Enewsletter
July 2013
How to Photograph Local Nature and WildlifeDoug Sahlin treks the Florida landscape in search of resident alligators, birds, and plants with the Tamron SP 70-300mm VC lens. |
Article by Jenn Gidman Images by Doug Sahlin |
Nature and wildlife photographer Doug Sahlin works from his home base in Venice, Florida, with his wife and partner, Roxanne. More often than not, however, you'll find the two of them exploring the swamps, marshes, and preserves of Southern Florida (including nearby Myakka River State Park) on the lookout for resident birds, alligators, and deer, as well as local flora and nature imagery. |
The Tamron SP 70-300mm VC lens gives Doug the versatility he needs during his nature expeditions, while the Vibration Compensation feature ensures sharp images during challenging conditions. "There's a bird down here that fishes in the water, but it's not waterproof," he explains. "When it comes out of the water, it has to dry its wings before it can fly. With the 70mm end of that lens, you can get a beautiful close-up portrait of the bird with its wings spread wide open on the shore. Then, using the 300mm end of the lens, you can put some distance between yourself and animals such as deer and alligators, which might get spooked if you get too close." |
The VC ensures his images always come out sharp. "I leave the VC on pretty much all the time, especially in a place like Myakka, where there's a lot of foliage," he says. "There may be bright sunlight, but it can be pretty dim on the ground. Unless you want to crank the ISO up to the stratosphere, the VC allows you to shoot at slower shutter speeds and still get a sharp shot."
|
The VC comes in handy for another practical reason. "When you start out, you're pretty fresh," he says. "But after a long day of taking pictures and hauling gear when you've hiked for 3 or 4 miles, your hand might not be as steady as it was at the beginning of the day. With the VC, you can still get really sharp images even though your own steadiness is waning." |
The 70-300 wide focal range also gives you some latitude when shooting dangerous animals in the wild. "If it's possible, you usually want to photograph wildlife at the animal's level, eye to eye," he says. "But if you're shooting an animal like an alligator, which can move very fast and be quite dangerous, you want to be at a higher vantage point and further away. The 300mm end does give you some buffer, but just be cognizant of how fast these guys can really be." |
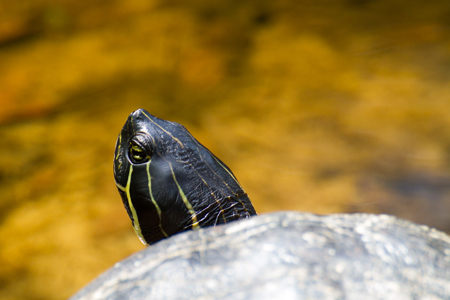
Focusing on the animal's eye is the key to achieving an in-focus shot. "The eyes are the windows to the animal's soul, just like in people portraits," Doug says. "If you look at a picture like that where the eye's not in focus, you'll think the whole image is out of focus." |
Showing the animals in their natural surroundings is a great way to capture a compelling environmental shot. "You may be photographing a deer or a coyote in Yosemite, for example, and want something prominent in the background, like Half Dome," he says. "In that case, you want the animal sharp and in focus and the background blurred but recognizable - to do that, you can shoot at F/5.6 or F/7.1 instead of shooting wide open." |
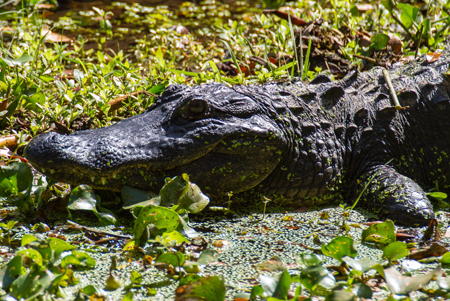
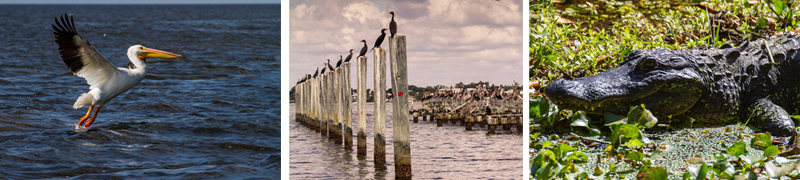
Doug was able to catch one alligator during some slower downtime in the water at the Corkscrew Swamp Sanctuary in Naples. "I shot this just after noon, so it was pretty harsh light," he says. "The alligator is razor-sharp (you can see the spots of algae on it and its teeth sticking out of its mouth), but the lily pads in the water are nicely out of focus, so you get a sense of its surroundings. I shot this at 300mm at F/7.1."
|
While it's often recommended to shoot in Shutter Priority mode when photographing things in motion, Doug suggests experimenting with the Aperture Priority mode instead. "If you've got something in motion going pretty fast and you want to get a little detail in the background, you want to know that your aperture works with that shot, or you'll have too limited a depth-of-field," he says. "You might dial in to 1/1000th of a second, but the conditions could be so dim that your camera ends up shooting wide open, resulting in a limited depth-of-field. Plus, if the animal is really large, you'll only have part of the animal in focus. When I'm shooting wildlife standing still, I almost always shoot in Aperture Priority mode and choose the aperture I want to determine how much of the background I want to be in focus." |
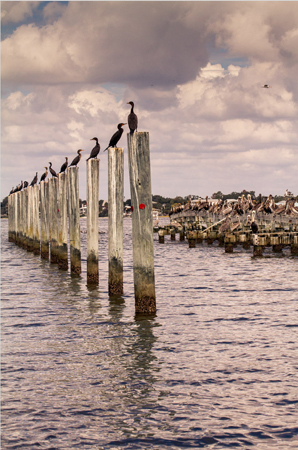
Florida is a birding paradise, so many of the subjects in front of Doug's camera are of the feathered variety. "If you've got a bunch of flying birds, you want to shoot in continuous drive mode so you can just press the shutter down and capture however many frames per second your camera is capable of," he says. "Most cameras also have a track-focus mode you can switch to: If a bird moves closer to you or farther away, the camera will change focus accordingly."
|
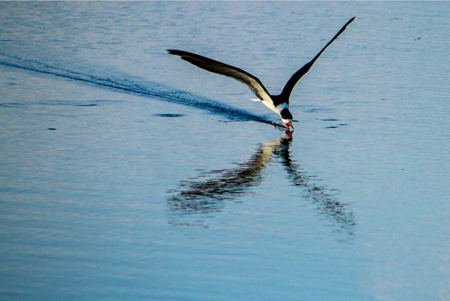
Doug also suggests practicing with panning to photograph birds in flight. "You can pretty much tell when a bird is getting ready to fly," he says. "It will generally lighten its load, if you catch my drift, and then you can get ready. Generally its beak is also pointed in the direction it's going to fly."
|
Positioning both feet shoulder-width apart, Doug forms a human tripod right before he starts his panning motion. "I put my elbows by my side and get as stable as I can, then pan in a nice, smooth motion," he says. "When you're panning, you can shoot at a slower shutter speed to blur the background. With the VC on, you can shoot down around 1/125th and still get a pretty clear shot with a little blur in the background." |
On their honeymoon last October, the Sahlins went to Cedar Key in Florida, where the proprietors of the place where they stayed took them out on a flat-bottomed boat. "We headed out to this sandbar where pelicans come to roost - there must have been 1,000 of them there," Doug says. "I've never seen so many birds in my whole life. As the boat got closer to them, they got a little spooked and flew off. I was able to get a shot of a pelican taking off with its feet still dragging in the water (you can see a little bit of whitewater near its feet where it's dragging them). I was zoomed out fully to 300mm; I shot at 1/1250th, so the bird was pretty much frozen in the image. Because I had been shooting so many of the birds before, I was at F/13, which is a pretty small aperture. But even at F/13, you see the soft, blurry ocean behind it because of the compression of that 70-300 lens."
|
With the 70-300, Doug is also able to capture the details of the natural beauty around him. "When I see nature that's interesting, instead of simply looking straight ahead, I like to look up and look down," he says. "You might look up and see the most beautiful pattern in a leaf canopy overhead, or you might look down and see a fall of leaves that could make an interesting photo. With the 300mm end of that lens range, you can shoot down like that because the focusing distance is about 4 feet." |
When he photographs these smaller flora and fauna, Doug likes to focus on his subjects and blur out the background. "I've got a great shot of a butterfly that's landed on a flower, but in the back you have this amazing, out-of-focus bokeh," he says. "I got a pretty little white flower against an out-of-focus green background in much the same way - I just shot wide open and zoomed in on the flower."
|
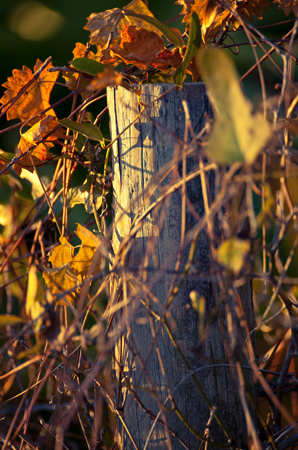
Seeking out seemingly ordinary items in nature (even if they're man-made) set in the right light can make for beautiful photos. "I like to get details of fence posts, for example," Doug says. "They're very photogenic. One of my favorites is of a post I shot close to sunset. The post is totally in focus, but there's a tangle of weeds around it with bright colors, which really stands out."
|
Doug often employs an abstract in-camera motion blur effect when he's at the wildlife preserve. "I basically zoom in on a subject, like a stand of trees or some tall grass like you'd find on the side of a marsh," he says. "I choose a very small aperture so I've got a slow shutter speed, like 1/6th of a second or 1/2 of a second - then I press the shutter and gently move the camera up. You get this abstract effect with controlled motion blur that's really cool." |
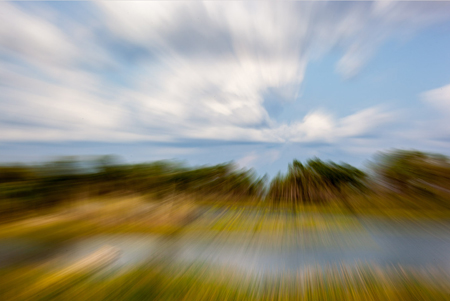
Another interesting technique Doug dabbles in for a more artistic effect with the 70-300 is zoom blur. "I started one image like this of the landscape in front of me at 70mm, then quickly racked the lens out to 300mm," he says. "The background slowly gets bigger, like it's sliding toward you. You can make out there's a forest and clouds, but now there's some motion involved. You're limited only by your imagination with this lens!"
|
To see more of Doug Sahlin's work with his wife and partner Roxanne Sahlin, go to www.dougplusrox.com or to their Facebook page. Check out Doug's recent book "Mastering the Lensbaby," on Amazon. |