Tips for Shooting HDR
John Neel offers advice for achieving intense imagery using the HDR technique. |
Article By Jennifer Gidman
Images by John Neel |
High dynamic range (HDR) imaging refers to a method used to capture what would normally be impossible detail in your images. By capturing a series of underexposures and overexposures of the same subject, then merging them all together with a normal exposure, you're able to capture both highlight and shadow details for a more visually realistic image.
|
John Neel, who writes often about HDR imaging for Pixiq, explains the appeal of this art form. "A lot of people who don't like HDR tend to think of the process as a very hard-edged style that's overcooked," he says. "Overcooking can happen to any image using any software." The bad effects come from making incorrect choices in the HDR software. "I try to get something that's relatively natural, even though sometimes I tend to manipulate the colors. I find a slight oversaturation helps to 'pop' the subject. You can easily oversaturate a non-HDR image, too. It's just a matter of controlling it." |
Neel uses a variety of Tamron lenses and recently began to play with the Tamron 28-75mm F/2.8. Read on for his tips on how to achieve the best HDR images. |
Use a tripod.
Depending on the camera used and if it is possible to use fast-enough shutter speeds, you can shoot images handheld for HDR photos. However, you're always much better off on a tripod. If you shoot handheld, even slight motion from one frame to the next is going to cause the image not to be as sharp as you need it - when you blend it in HDR processing, the software might not be able to get everything to line up 100 percent and you'll get ghosted edges. At night, I always use an electronic remote shutter release. |
Use auto exposure bracketing, but go manual when you need to.
Different cameras have different HDR capabilities. On my camera, when I press the shutter button after selecting auto exposure bracketing, it takes three or five images automatically. There are other times when I set the bracketed shots manually if I need a greater range of stops than what the auto bracketing will give me.
|
Don't worry about what time of day you're shooting.
The great thing about shooting HDR is that you can shoot in the middle of the day. If you shoot a single image without HDR in the middle of the day, you're likely going to blow out your highlights or block up your shadows. With HDR, you intentionally blow them out by overexposing a few frames, then intentionally underexpose them in other frames, and that's going to potentially work to your benefit when you put them all together and layer them - the overexposures give you shadow detail, and the underexposures give you highlight detail. |
Think about when to convert to black and white.
When you shoot digital, you get both a color image and the possibility for a black-and-white image. It's just a matter of thinking about your subject and how it would best be rendered.
|
Be aware of details. A lot of times, a color image might show colors in the background that detract from your main subject. A good photographer knows that before he even shoots the picture and will compensate somehow during shooting or consider it better to finalize it as a B&W image. The same thing goes if your subject isn't that vibrant, but the same subject would have nice contrast that lends itself to a black-and-white image.
|
Use HDR to evoke an old-time feel.
HDR worked really nicely for a parade in which I shot some classic fire trucks. The HDR really makes those old-time vehicles pop. It reminds me of old magazine prints, where the colors were a little more saturated, almost like a Norman Rockwell painting. It's a very nostalgic look.
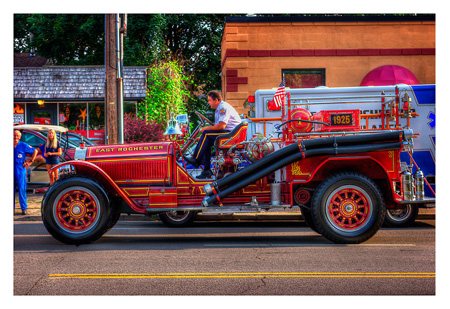
|
The 28-75mm lens worked great for these fire truck shots because of its slight compression capabilities. This lens gives a very normal perspective in the middle of the scale, but when I push it with the zoom, you get an interesting compression. That guy standing off to the side of the fire truck in the blue suit and the girl behind him - that's still a natural-looking distance there. |
Control the process in software.
I use Photomatix Pro or sometimes Nik's HDR Efex. I take the image through the program several times. Rather than relying on a single result, I say, "OK, here's a background detail I really would like to save, and there's a foreground detail I really want to get." I process two or more different variations and then blend them in Photoshop to get the final result. The extra effort is worth the time.
|
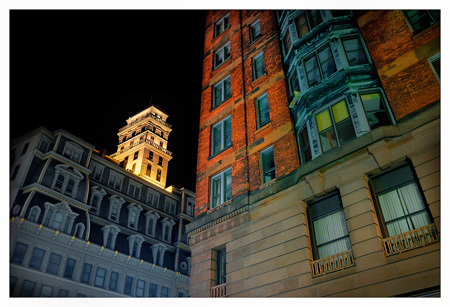
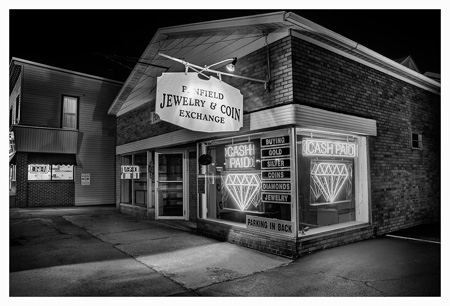
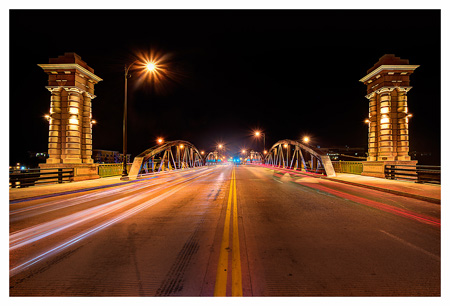
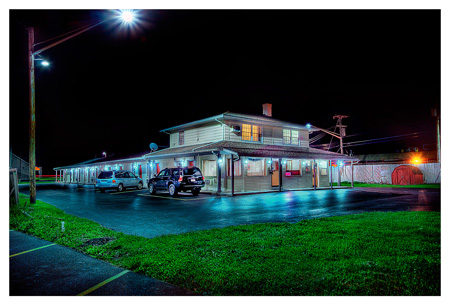
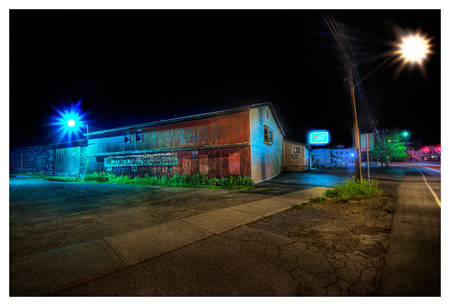
Don't shy away from nighttime HDR.
Nighttime HDR is very different from daytime HDR: Subjects present themselves by their lighting, but you have to go out and find them. I like to overlap the different kinds of light out there: fluorescent, tungsten, headlights, taillights, mercury vapor, and sodium vapor. Each light source has its own color characteristic. All these different colors blend in all sorts of interesting ways. You won't get that during the day, because you're typically using one light source (the sun), but at night there are all of these different light sources, which have their own color characteristics that overlap and intersect with each other. [Click here and here to see more of Neel's nighttime HDR photos.]
|
To see more of John Neel's work, check out his work at Pixiq.com.
|

