Enewsletter
February 2012
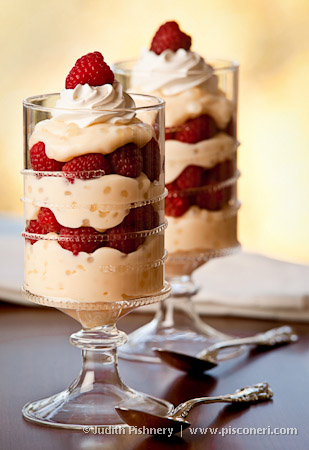
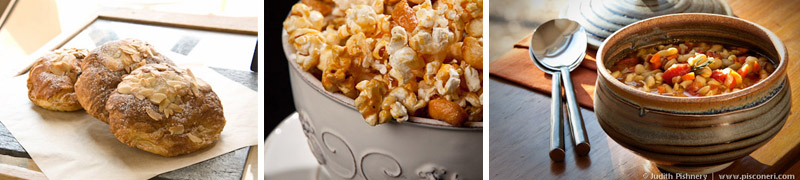
A Feast for the EyesJudith Pishnery creates a visual banquet shooting food photography with her Tamron SP 70-200mm F/2.8 lens. |
Article By Jennifer Gidman Images by Judith Pishnery |
Judith Pishnery usually has a lot on her plate - especially when she's commissioned to shoot food photography for her editorial, packaging, or cookbook assignments. Preparation, styling, and placement of the edible items on the dish are just the first phase of creating a delectable image. You also have to know how to light your subject, what angles best represent the food's composition, and even what provisions can remain under the camera lights for the long haul and which ones fade fast.
|
Pishnery gets cooking behind the camera with her Tamron SP 70-200mm F/2.8 zoom lens. "Obviously, the range of focal lengths with this lens is great for food photography," she says. "Plus, that fast F/2.8 maximum aperture is terrific for shallow depth-of-field, especially if I want to isolate just a small section of the subject on the plate in front of me." |
The fact that her husband and business partner is a culinary professional and an art director helps Pishnery during the planning phase of a shoot. "Because he has both an art and food background, he does most of my food styling," she says. "We collaborate on the general concept and color palette and often go prop shopping (for backgrounds and plates, for example). He prepares the food, and then we work to figure out how it's going to be placed on the plate on set." |
Positioning depends on what type of assignment she's shooting. "You have to think of a composition that's going to work for the client," Pishnery says. "For example, they might have type placement or headline concerns if they're going to use your food image on an editorial page or on a package. You have to factor that in while you're shooting - for instance, making sure you have a clean background so that there's a place for text." |
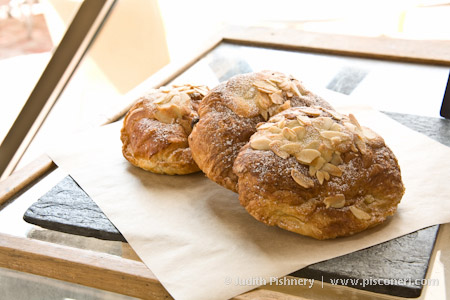
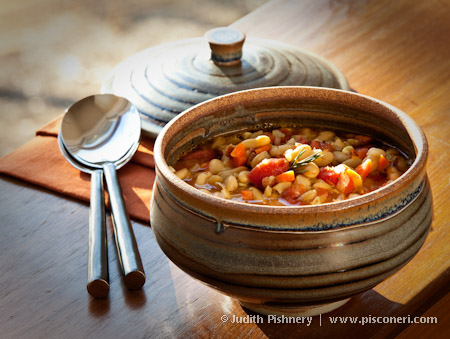
You also need to examine the food and decide what angle will best represent it. "You might want to shoot down on the plate like you're sitting at the table, looking down at your meal," Pishnery explains. "If you're featuring an entire lunch or dinner on a dish, you'll probably want to shoot down on it, similar to the diner's viewpoint. However, there are other foods that you want to shoot straight on from the side because they have almost a monumental aspect to them or because of the nature of the item. Chocolate Whoopie Pies are a good example of that: If you just shoot down on one, you'll probably only get the chocolate top and not the filling - shooting from the side enables you to capture the entire essence of the item."
|
Lighting to Make Her Subjects Luscious |
When she's shooting in her studio or on location in a restaurant, Pishnery doesn't always have the luxury of a lengthy time frame - and, depending on what food she's shooting, she might not be able to keep the actual subject under the camera lights all day long. "What I always do is set up my shot and use a stand-in first," she explains. "We'll have the same-size plate and the same food (just not 'styled') on that plate as what we're going to use in the final shot so we can completely arrange the shot and see what our lighting looks like. That setup could take as little as 30 minutes or as long as several hours - but the actual food I'm photographing may not be on the set that long because I'm not dropping it in until I have all my lighting and camera angles set up."
|
Pishnery uses flash in almost every shot. "I've done a lot of lighting over the years and have good control over it, but I'm always trying to model that light so I don't flatten out my subject," she says. "I might use a sidelight or backlight as my main light, and then a fill light - either a second light or a reflector like light foamboard - so the shadows aren't too harsh and dark. Even when I shoot in just natural light, I often use a reflector to kick some light back into those shadows."
|
The texture of Pishnery's subject can dictate whether she zooms in for detail shots and how she incorporates the lighting. "If there's a beautiful texture to the food, I usually add some sidelight to pull out that texture," she says. "You don't want to light it too flat, because then it looks dull and not very interesting."
|
Although Pishnery says the white balance presets on her DSLR perform well, she typically puts a gray card into the shot and adjusts the white balance when she's doing the RAW file post-processing in Lightroom. "I can do the white balance right off the gray card and get to neutral," she says. "However, even if your white balance is generally correct, food generally looks better warmer, so I'll shift the white balance more toward the warmer side." |
The preparation is another tricky aspect of photographing food. "When you're eating something, even if the food itself looks just 'OK,' the fabulous aroma and taste are what you remember," Pishnery explains. "When you're looking at a photograph, though, you only have the visual to guide you. The food photographer has to fill in for those missing senses and evoke that sense of taste and smell with the visual alone. The photograph has to look delicious and mouth-watering."
|
Cooked foods, for example, can be especially difficult, because you don't necessarily prepare them the same way to look good in front of the camera as you would cook them to actually eat them. "If you cook meats, for example, to the correct eating temperature, they tend to shrink a little bit and turn darker," Pishnery says. "They don't look as good unless they're slightly undercooked. I often recommend to my students who are shooting food to start out with shots of fresh fruits and vegetables or items that look good right out of the package. Think of subjects that don't need a food stylist; items that just need a good aesthetic eye." |
Capturing the final image also requires careful communication with the chef and spot-on timing. "I usually give them a 10- to 20-minute heads-up for when I'll be doing the real photo," Pishnery says. "Sometimes they need that little extra guidance. I was photographing a root beer float for one shoot and I was still setting up the lights when the chef came out with the float already prepared. I told him I could use it as my stand-in but that he'd have to make me another one. When I was ready, he brought me a second one - but that one had his handprint on the side of the frosted glass from when he carried it out. The third one was the charm!" |
Judith Pishnery is a professional photographer and professor at the Savannah College of Art and Design (SCAD). To see more of her work, go to www.pisconeri.com. |